Authentication as a Service for Enterprise Applications

In this article let’s look at how we can design a robust authentication framework that could cater for heterogeneous identity management requirements in an enterprise landscape. Authentication is just one but an important aspect of a wider security implementation and it is always advisable to consider the “big picture” of security when it comes to framework design and technology selection.
Basics in brief
It is not the intension of this article to cover the fundamentals but what really is authentication? In simple terms it is the process of identifying your self to a service provider before receiving the service. Term authentication is often used in conjunction with the term authorisation which is concerned with agreeing which services the user has access to.
Authentication may be achieved in several different ways depending on the type of application and the context in which it is used.
- Logon Authentication — in this method user provides some form of credentials to authenticate them selves. This could be username/password, smart card, finger print, voice pattern, retinal scan etc.
- Single Sign On (SSO) — instead of logging into individual applications, user would log into a domain which in turn provides access to multiple applications belonging to the domain
- Remote Authentication — user connecting to a secured remote network may be authenticated by different methods such as Password Authentication Protocol (PAP), Challenge Handshake Authentication Protocol (CHAP), Extensible Authentication Protocol (EAP) etc.
There are number of protocols used for authentication such as Kerberos, SSL, Microsoft NTLM, PAP and SPAP, CHAP and MS-CHAP, EAP, RADIUS, Certificate services etc.
In designing modern applications an area of interest would be API authentication. In a service driven architecture, the client applications would obtain services through the service APIs and the services need some mechanism to build trust with the client. Some common approaches used are,
- Basic Authentication — the username and password is passed in every API call which is validated by the service before responding to the call. This method is very simple however it has many drawbacks especially when used in a public network and the use of SSL is a must to avoid “man in the middle” attacks. However basic authentication could still provide a simple enough authentication solution for services that would essentially be internal.
- API Keys — users have to login just one time where an API key would be provided that can be used in further communications with the API. This approach reduces the threat surface given that username and password are exchanged just once. Also it is more efficient compared to basic authentication as the key validation would be simpler compared to username/password validation. Still the API keys can be compromised in an insecure network so not the best choice for a public network.
- OAuth — OAuth is not exactly an authentication method but more of a “ delegation” mechanism with some capabilities of authorisation. Following a successful authentication, OAuth provides a token that is independently verifiable by the service. Also OAuth supports the establishment of scope which could be used to for authorisation.
Design for enterprise
Enabling authentication is not that difficult given the technologies and the tools available, but designing for the needs of the enterprise is lot more complicated. It requires taking a broad view towards the stake holders requirements and building a robust and a scalable framework. Following are some key aspects that needs to be looked into during the design phase.
- Architecture — the architecture behind the application is an important consideration. For example in a monolithic architecture the authentication function could be tightly coupled with the core application where as in a service oriented or micro services architecture the authentication function should be decoupled and reusable by all services.
- Integrations — the diversity of the components in the application landscape needs to be looked into. It is likely that 3rd party applications are integrated that requires different types of authentication. For example your in-house developed services may be authenticated by OAuth but you may need to integrate a 3rd party component that only supports basic authentication
- Identity storage — enterprise applications often coexist with other applications in a larger technology landscape. Therefore an application-local user store may not always be ideal and facility should be available to integrate external identity servers
- Features — when it comes to modern applications, there is a huge demand for security features such as multi-factor authentication, identity federation, social logins etc. Authentication service should enable these features efficiently and conveniently.
- Non functional requirements — in designing authentication, your general design principles should apply without any compromise. For example authentication function should have low latency, should be scalable and reliable. Also if your application is multi-tenanted so should authentication be. Strong auditing capability is another important requirement to consider.
Authentication as a Service (AaaS)
Authentication as a Service or AaaS is aimed at centralising the authentication logic and making it available as a service to other applications in the system landscape. AaaS should support standards such as OpenID Connect, SAML etc. and should provide the identity services typically through an API. This approach simplifies application development as the only requirement is to consume the authentication service.
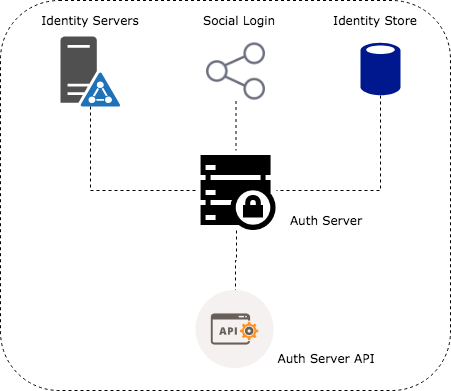
In the heart of an AaaS model would be an authentication server providing an internal identity store as well as integration to 3rd party identity providers such as LDAP servers, social platforms etc.
In a typical authentication flow the application requiring authentication would redirect the user to a login page hosted by the auth server. Auth server would then validate the user credentials and issue an auth token which would then be passed on to the client application. However there can be alternative approaches where the client application uses the auth server API to validate credentials and obtain the auth token.
There are couple of important points to note with the AaaS model
- Scalability and Reliability — with this model we are now centralising the authentication function. Therefore we have to ensure the high availability and scalability of the Authentication server to avoid single point of failure.
- Adaptation — if you are bringing in the AaaS model into a somewhat legacy architecture you would need to carefully consider how you would position the authentication service in the application landscape. For example if the legacy applications already maintain user accounts, it will need to be migrated across to maintain a single point of truth. But the individual applications may still need detailed user information so some data may still reside in the application level. This is where you would need to draw a boundary between what you consider as “user account” and “user profile” and manage account data in auth server and profile data in the application level. However there is a capability of passing user data especially when OpenID Connect is used but again there are limitations to the volume of information that could be passed on in an ID token.
Authentication Server Technologies
There are couple of approaches that could be taken to enable AaaS for your application. Firstly you can consider developing the Auth server and the ecosystem from the scratch. For example, to enable OAuth capability you can use following libraries depending on the type of stack you are running. Whilst this approach may offer you flexibility you are likely to be reinventing the wheel to some extent given the range of off-the-shelf auth server implementations available. If you make the right choice you can benefit from the best practices the product would naturally bring. So my advice is to adopt an existing product unless your requirements are very different to the rest of the world.
During our research we looked number of solutions including Keycloak, CloudFoundry UAA, Keystone, Forgerock, Midpoint and Apache syncope. Some interesting comparison is available at https://compare.evolveum.com/features-table.html
Keycloak by far was our first choice as it seems to satisfy most number of requirements. It’s an open source product maintained under the stewardship of Red Hat. From an integration perspective, one of the biggest advantages of using Keycloak has been the availability of adaptors which does most of the heavy lifting when it comes to token validation, token refresh etc.
Keycloak integration allowed us to facilitate an identity store internal to the product and also offered the flexibility to federate identity from external stores such as LDAP servers. Keycloak comes with a built-in LDAP/AD plugin and could be extended to use other identity servers through the service provider interface (SPI).
Keycloak Authentication
If you are interested in getting your hands dirty with keycloak authentication, please continue. Let’s look at how we can configure keycloak authentication server with minimal settings and enable security in the applications. The application considered is a web application where the content is served through a Express.js web server and the java based backend is accessed through a REST API protected by spring security.
Note that keycloak documentation is comprehensive and the steps below would only be explaining the mandatory steps.
Installation and configuration
- Keycloak standalone auth server distribution can be downloaded from here
- Downloaded file may be extracted in following manner
Linux/Unix$ unzip keycloak-4.1.0.Final.zipor$ tar -xvzf keycloak-4.1.0.Final.tar.gz
Windows> unzip keycloak-4.1.0.Final.zip
- The keycloak server can be started in the following manner
Linux/Unix$ …/bin/standalone.sh
Windows> …\bin\standalone.bat
- By default the server starts on port 8080. So for example if you installed locally, then you may access the auth server admin console through following url http://localhost:8080/auth
- During the first login you will be required to create an admin account to access the admin console.
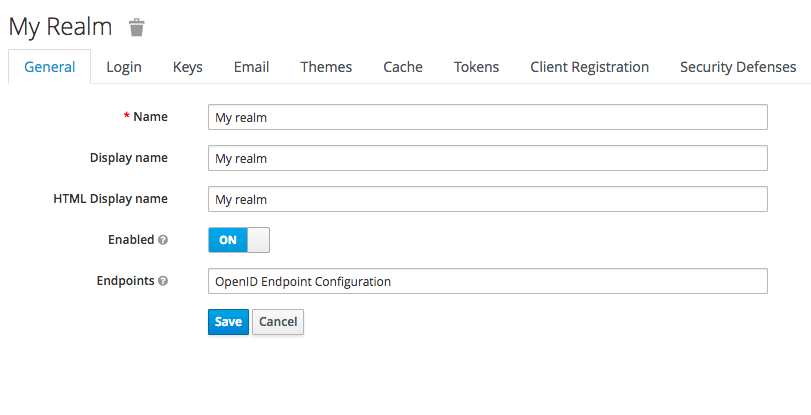
- Once logged in you will be required to create a “Realm”. This would be almost like a container for all authentication settings for a given context. If your application is multi-tenanted then you might consider creating a realm per tenant considering the degree of autonomy you would like to provide to your end users.
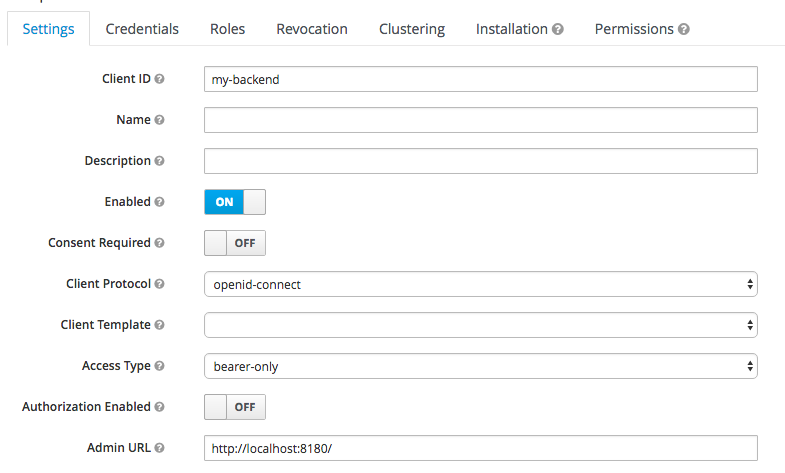
- Next step is to register the client applications with keycloak. This would be done in the “Clients” section of the admin console. We would separately register our node application and the backend service.

Note the following important settings
- Client Protocol — you can choose between OpenID Connect or SAML
- Access Type — you can choose between public, confidential and bearer only. Only public and confidential types would initiate a login action whereas bearer only type would only validate bearer tokens and would not initiate a login action.
- Valid Redirect URI — a valid url pattern that keycloak would redirect to after a successful login
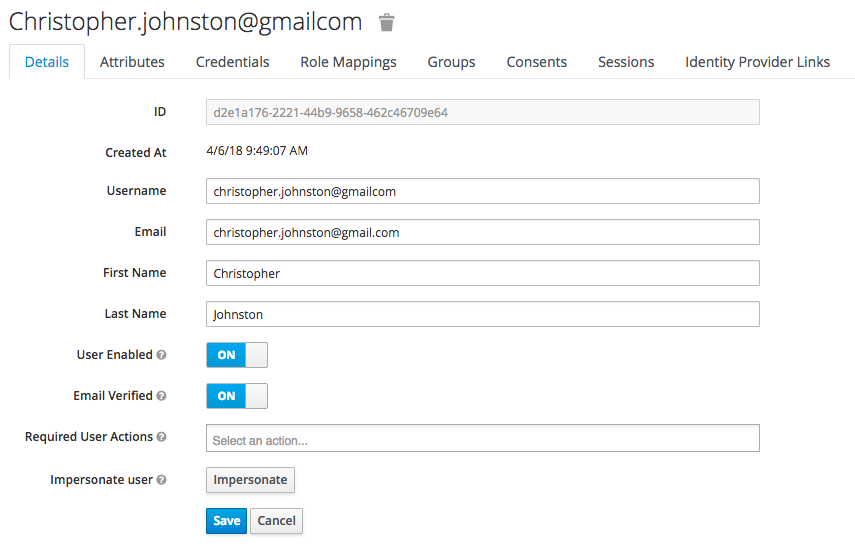
- Now the auth server is almost ready to go. You may want to setup some user accounts to test the configuration. Make sure you setup credentials and assign some user roles.
Protecting the front-end
In-order to simplify integration with the auth server, there are adapters made available for various platforms. Full list of adaptors are available here
The front-end would be protected by the keycloak Node.js adapter.
- A keycloak.json file in the below format need to be placed in the root directory of the project
- Note that the keycloak.json file should now refer to the frontend application. The “realm” and “auth-server-url” are read from the environment variables.
{
"realm": "${env.KEYCLOAK_DEFAULT_REALM_REF}",
"auth-server-url": "${env.KEYCLOAK_SERVER_URL}",
"ssl-required": "external",
"resource": "my-frontend",
"public-client": true,
"confidential-port": 0
}- Following code would enable keycloak security
var Keycloak = require('keycloak-connect');
var memoryStore = new session.MemoryStore();
app.use(session({
secret: 'mySecret',
resave: false,
saveUninitialized: true,
store: memoryStore
}));
var keycloak = new Keycloak({
store: memoryStore
});
app.use(keycloak.middleware({
logout: '/signout',
admin: '/adm'
}));- Each route need to be protected with keycloak middleware
app.get(‘/profile’, keycloak.protect(), myRenderFunctionHere());
Protecting the backend
It is assumed that application backend is protected by spring security. Keycloak spring security adapter enables keycloak authentication for the java backend.
- Add the following maven dependancy for your project
<dependency>
<groupId>org.keycloak</groupId>
<artifactId>keycloak-spring-security-adapter</artifactId>
<version>${keycloak.version}</version>
</dependency>- Adaptor uses the keycloak.json file to locate and establish communication with keycloak server. This needs to be placed in the “resources” folder. The content should be following.
{
"realm": "${env.KEYCLOAK_DEFAULT_REALM_REF}",
"bearer-only": true,
"auth-server-url": "${env.KEYCLOAK_SERVER_URL}",
"ssl-required": "external",
"resource": "my-backend",
"confidential-port": 0
}- In addition following entries should be available in the application.properties file
keycloak.auth-server-url=${KEYCLOAK_SERVER_URL}
keycloak.realm=${KEYCLOAK_DEFAULT_REALM_REF}
keycloak.resource=my-backend
keycloak.realmKey = ${KEYCLOAK_REALM_KEY}
keycloak.bearer-only = true
keycloak.credentials.secret = ${KEYCLOAK_CLIENT_SECRET}
keycloak.ssl-required = external
keycloak.cors = true- By default keycloak provides an Authentication Manager implementation which is org.keycloak.adapters.springsecurity.authentication.KeycloakAuthenticationProvider. However we need to extend this so that we can inject the user profile (loaded from the target application) into the security context. A typical provider implementation is shown below.
public class CustomKeycloakAuthenticationProvider extends KeycloakAuthenticationProvider {@Autowired
UserService userService;@Override
public Authentication authenticate(Authentication authentication) throws AuthenticationException {
KeycloakAuthenticationToken token = (KeycloakAuthenticationToken)authentication;
CustomKeycloakAuthenticationToken customToken = new CustomKeycloakAuthenticationToken(token.getAccount(), token.isInteractive(),null);
KeycloakPrincipal keycloakPrincipal = (KeycloakPrincipal) token.getPrincipal();
KeycloakSecurityContext securityContext = keycloakPrincipal.getKeycloakSecurityContext();
AccessToken accessToken = securityContext.getToken();
User user = userService.findByUserName(accessToken.getPreferredUsername());
customToken.setSubject(user);
return customToken;
}- Note that the Authentication Token implementation is overriden here to hold the user object.
public class CustomKeycloakAuthenticationToken extends KeycloakAuthenticationToken {private User subject;public CustomKeycloakAuthenticationToken(KeycloakAccount account, boolean interactive, Collection<? extends GrantedAuthority> authorities) {
super(account,interactive,authorities);}public User getSubject() {
return subject;
}public void setSubject(User subject) {
this.subject = subject;
}
}- Finally you may adjust your security context to use the custom authentication provider
<sec:authentication-manager alias="authenticationManager">
<sec:authentication-provider ref="customkeycloakAuthenticationProvider" />
</sec:authentication-manager><bean id="customkeycloakAuthenticationProvider" class="[FQN of the auth provider class]" /><bean id="keycloakAuthenticationProcessingFilter" class="org.keycloak.adapters.springsecurity.filter.KeycloakAuthenticationProcessingFilter">
<constructor-arg name="authenticationManager" ref="authenticationManager" />
</bean>
Thats it really. You have now setup an auth server and connected you application to be authenticated by keycloak.
Conclusion
As stated before the key to a successful authentication framework depends a lot on the design. You should invest your time wisely to understand the big picture, define scope and select the right technology. There is rarely a “one size fits all” solution