Are the Data Lakes Delivering on the Promise?

Over the last decade, the data lakes have evolved to become a very popular infrastructure pattern for managing big data. Data lakes were introduced to overcome the challenges associated with traditional data warehouses such as slowness in data source integration, inability to capture unstructured and semistructured data and the scalability of the infrastructure. More than a decade into evolution, the businesses are staring to question if the value is delivered by the data lakes. This article aims to discuss some drawbacks with data lakes and introduce some architectural designs emerging to address such problems.
What is a Data Lake?
The concept of a data lake was coined in 2010 by James Dixon, founder of Pentaho in one of his blog post that outlined his company’s first Hadoop-based release,
If you think of a datamart as a store of bottled water — cleansed and packaged and structured for easy consumption — the data lake is a large body of water in a more natural state. The contents of the data lake stream in from a source to fill the lake, and various users of the lake can come to examine, dive in, or take samples
The basic philosophy of the data lake is to “store everything” and “use when required”. It differs from data warehouses which requires a schema to be defined before the data is ingested. The data lakes follow a schema on read approach where the data is ingested in their raw format and schema is enforced only when the data is accessed. This enables quick integration of data sources and the ability to capture semistructured and unstructured data in variety of formats. Another key advantage is the horizontal scalability which enables large volumes of data to be stored. The value generation from the data is expected to be faster as the data is consolidated and available in a single platform.
Taking a Deep Dive in to the Data Lake
With many advantages on offer, modern organizations have invested heavily on building data lakes to consolidate data from siloed systems and build data products which deliver value. However it has not been smooth sailing and there are many challenges that organizations are discovering throughout their data lake journey.
From Data Lake to Data Swamp
Unless there is strict governance in place, a data lake can easily become a data swamp, a dumping ground for volumes of data. Unlike in data warehouses, it is extremely difficult to catalog data making it very hard to keep track of what’s swimming in the data lake. This would mean that it is very complex to implement governance protocols such as access control, retention policies and privacy policies.
Consolidating data from siloed systems is no easy task. Data Lakes depend on metadata to derive relationships between various data segments and to establish data lineage. In absence of quality metadata, generating value from large volumes of data could turn out to be a a tedious task.
The “store now and use later” approach leads organizations to collect large volumes of data without a clear goal in mind. When this happens the data lake is flooded with data which provide no value and may never be used.
Ownership of Data
Who owns the data in a data lake? Usually a centralized IT or Engineering team is responsible for managing the data lake. However such teams lack domain knowledge on the data which makes it harder for them serve the end user demands. Often such teams are seen as a bottleneck in the value chain.
Also there is no contract with the domain data owners to contribute quality data sets to the data lake. This makes life harder for the team in the middle in serving the end user demands as they often have to deal with data quality issues originating from the data sources.
Delivering Value
Data swamps coupled with weak ownership of data can lead to serious problems in generating value out of the data lake. The challenges in data discovery and data quality at times outweigh the advantage gained during data ingestion and storage. A system that was built for faster insights may not deliver at the speed that it was suppose to, making the business leaders question the ROI.
The Changing Waters of Big Data
Organizations today are reevaluating their options in making sense out of big data. On one end they are looking at solutions which enforce stronger governance and ownership. On the other hand they are looking for solutions which are less data hungry. Here we look at some emerging trends that aims to address the type of problems discussed previously.
Data Mesh
Data Mesh is an architectural paradigm which promotes a domain driven model for managing data. The idea is for the teams with domain expertise to own their data and service the use cases through standardized APIs using a self service data platform. The key change in this model is the decentralization of the data ownership which leads to a value focused approach in managing data. There are four underpining principles of a Data Mesh implementation.
- Domain-oriented decentralized data ownership and architecture
- Data as a product
- Self-serve data infrastructure as a platform
- Federated computational governance
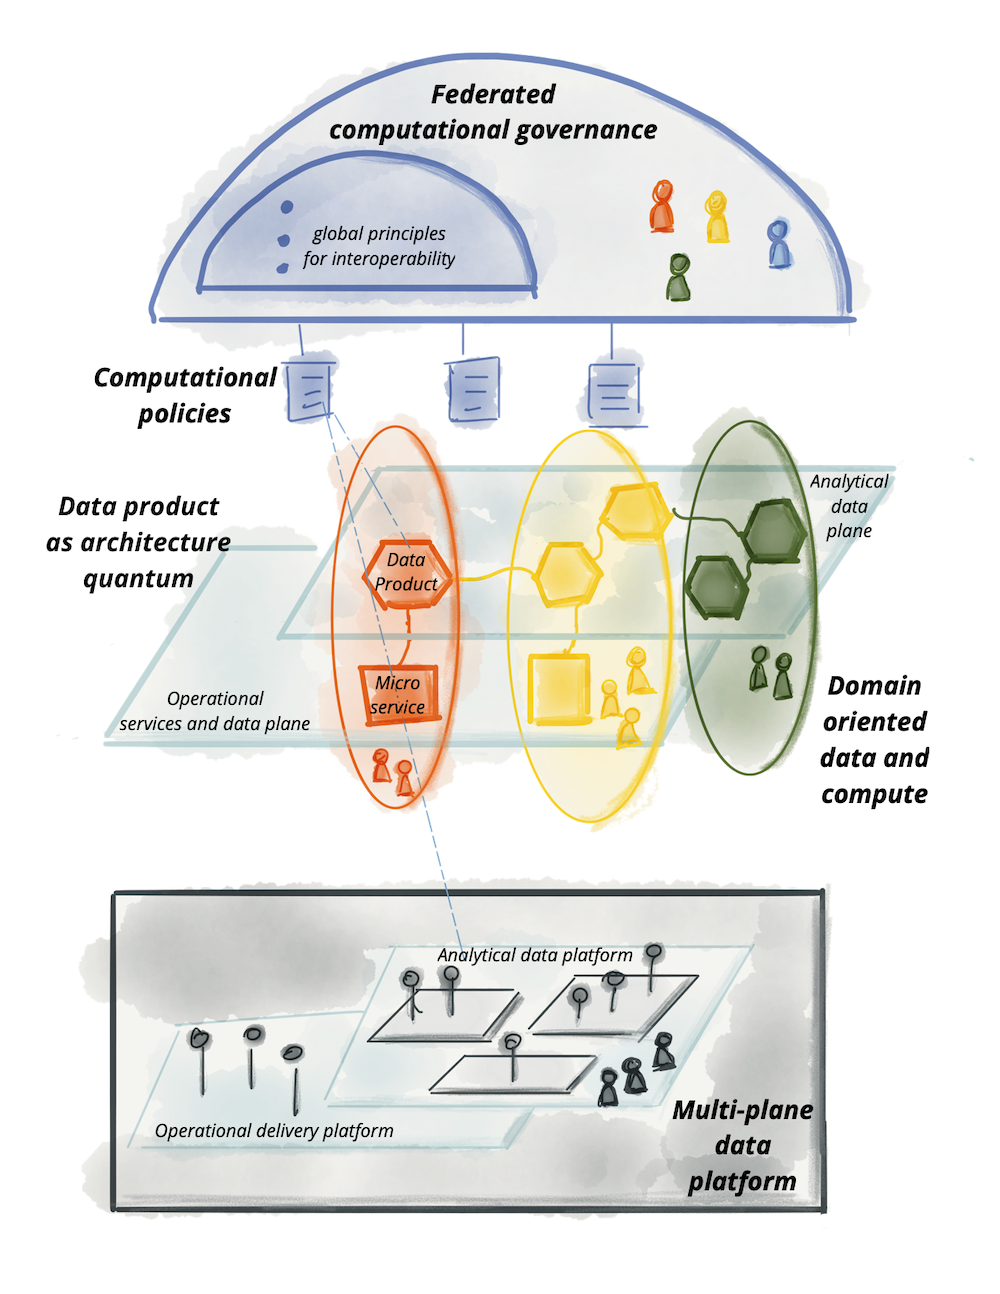
The big data technology landscape currently in practice would still be relevant in the Data Mesh context however more innovation can be expected in data access and governance use cases as the adoption increases.
Small and Wide Data
As per Gartner 70% of organizations will shift their focus from big to small and wide data by 2025. The fundamental idea with small and wide data is to use smaller but more focussed data sets from variety of data sources to make the inferences. The advantage of this approach is that the decisions can be made on a more real-time basis as big data processing is not involved.
One of the biggest drawbacks of big data is the ability to adapt to changing environments. A good example was when COVID lockdowns were imposed worldwide, the systems that depend on historical big data became less effective as the behavioral patterns altered drastically from the norm. It was an eye opener for the data community to consider alternative approaches for making sense out of data.
Big data often serves the purpose of building big picture ideas and in the process some of the more fine grained information that actually drives the behavior may be lost. Small and wide data approach aims to address this problem by capturing more specific details.
In the small and wide data approach, the investment is more focussed on value generation compared to big data where the investment is more focussed on the technology platform for data storage and processing.
Conclusion
It is very much likely that the next revolution of data would not be bigger data but more up to date and personalized data. The solutions that emerge would focus on generating value out of data rather than storing large volumes of data. However the approaches like Data Mesh and Small and Wide data are still at early stages and would be interesting trends to observer in the coming years.
Use of Documentation in Complex Agile Environments

“Working software over comprehensive documentation” has been prescribed in the Agile Manifesto as a philosophy to make decisions on what level of documentation should be established. However we often come across hybrid environments where the business teams require a high degree of clarity on the deliverables while the agile development teams prefer brief and precise instructions on what needs to be built. Product Owners and Managers have a role to play in managing expectations of each category of stakeholders and ensure that nothing is “lost in translation”.
Most of the business users and end customers are very comfortable and familiar with the comprehensive documentation that they are used to: Business Requirements Document (BRD) ,Software Requirements Specification (SRS),Statement of Work (SOW) etc. However documentation is an important part of every system, Agile or otherwise, but comprehensive documentation as such does not always ensure product success. Given the fact that these are all-inclusive, monolithic business documents in which usually covers work of many weeks or months and decomposing it into smaller, independent requirements and solutioning upfront becomes very challenging when it comes to an iterative software development process.
When it comes to an Agile environment we should find the right balance between documentations, discussion and what to share with and with whom.It should be done and shared with the relevant audience in a just-in-time (JIT) manner.
Agile manifesto values “working software over comprehensive documentation”. This asks us to think about how much and which kinds of documents are needed and when they need to be written.But that doesn’t mean documentation can be done away with entirely; it’s necessary for teams to function. But it does suggest that minimizing documentation is a wise thing to do because creating a comprehensive spec for software development implies that all best solutions are known upfront. Here we are not just talking about a holistic approach into the solution, here we need to have everything solutioned and this task can be a little overwhelming for the scrum team as they need to take care of both the requirements specification and then the product backlog user stories.
When working with the scrum team, Product Backlog has to be the single source of truth. The Scrum team should not get involved in referring business documentation as a practice. Nevertheless it is not a good practice to have so many dependencies at the document levels as it can be very convoluted.
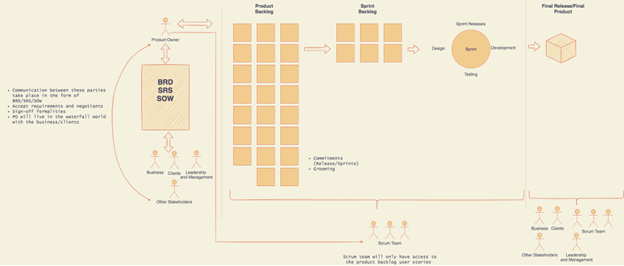
Between the Product Owner and customers communication still takes place in the form of documents or any sort of formal documentation. Product Owner continues to live in the waterfall world with their customers, by accepting requirements from them in the form of heavy static, conclusive documentations.
It’s the product owner’s responsibility to decompose heavy requirements documents into small independent chunks of work (user stories) to feed a backlog and get the acceptance from the scrum team in order to get the release/sprint commitments to inform the stakeholders. This is usually done in a silo, without the scrum team’s involvement.
Here is a diagrammatic view of the approach that I am suggesting.
Do we need to pertain to business sign-off in agile ?
Why not! Agile tells us to “embrace change” but the concept of change only exists with respect to a reference point. Although some Agile thinkers agree that “there is no sign-off” in Agile methodology, the practice of requiring product owners and clients to sign off on requirements and delivered work products persists in Agile settings.Even within a team where there is close communication, people can have different interpretations of current plans and status.
We intend to believe sign-off as some sort of contract, which definitely goes against the Agile grain. However, if you consider obtaining a sign-off as a small act of acknowledging that “You want to reach some destination’’ I think it’s fine. Just because “We have all the resources to move” today doesn’t mean we get to the correct destination but at least we can ensure a common understanding and point of reference as to where we should reach and by when. Having said that, this might depend on the businesses too. While some businesses would like to co-create with the development organizations, other businesses would require crystal clarity of what success looks like. It is a responsibility of the agile leadership to convince the benefits of co-creation to the business.
It must be mentioned that there is no exact science in deciding what level of documentation is required. The agile leadership should make decisions considering the nature of the operating environment and really focus on the purpose the documentation is expected to deliver in the particular context. The utopian state is that all stakeholders agree on high level goals and work together to continuously review and improve solutions inline with the set goals, in which case there is limited reliance on documentation.
Reference
Manifesto for Agile Software Development
We are uncovering better ways of developing software by doing it and helping others do it. These are our values and…agilemanifesto.org
DevOps: How to build an efficient CI/CD pipeline

Continuous Integration and Continuous Delivery has been on the top of the agenda for many agile software development teams for the last few years. It was recognized to be the foundation for establishing a DevOps practice which most organisations envisioned to be the key enabler for fast and reliable software delivery.
Continuous Delivery is a core ideology in agile software development. One of the first principles in Agile Manifesto established way back on 2001 reads as,
“ Our highest priority is to satisfy the customer through early and continuous delivery of valuable software.”
The success in agile software development strongly depends on the team’s ability to quickly roll out features to the end users and continuously improve the software incorporating the feedback from the end users. Shorter the cycle, better the user satisfaction would be. An efficient CI/CD pipeline would be the key to achieving such quick turnarounds.
Fundamentals
There are few fundamentals which drives a CI/CD pipeline.
- Integration and Verification — in a typical software development setup you expect multiple developers to be developing in their own feature branches which they periodically integrate to a common development branch. When a piece of code is integrated (or even before it’s integrated) , it is essential that a verification step is available that can quickly ensure that the particular integration would not break existing functionality, would not degrade performance or even would not introduce security loopholes.
- Automation — in-order to achieve speed, it is essential that verification is automated. i.e. this should be comprised of series of automated tests that would cover most critical aspects of the software and could be executed in a reasonable period of time.
- DevOps culture — the development team has a big role to play in ensuring the continuity of the pipeline. For example what happens when a build fails or test fails?. Fixing such issues should take top priority or otherwise it will diminish the returns of the CI/CD process.
- Containerisation — not mandatory but if the deployment is based on containers, it will reduce the complexity.
Our Approach
Designing a CI/CD pipeline for delivering an enterprise application requires consideration not only on fundamentals but also on practical challenges specific to the organisation or software. Some points to consider are,
- Software development process — CI/CD would produce the best ROI in an agile environment.
- Unit test coverage — this is a key piece of CI and if you are low on test coverage, it would make sense to work on that prior to implementing the CI/CD pipeline.
- Extent of automation — this would decide whether you can solely depend on automated tests or whether you want to introduce some manual testing also into the process.
- Nature of the test suite —the number of test cases or more importantly the time taken to execute the tests may need to be considered. For example if the tests take long to run, then it might not be practical to execute them at each code commit.
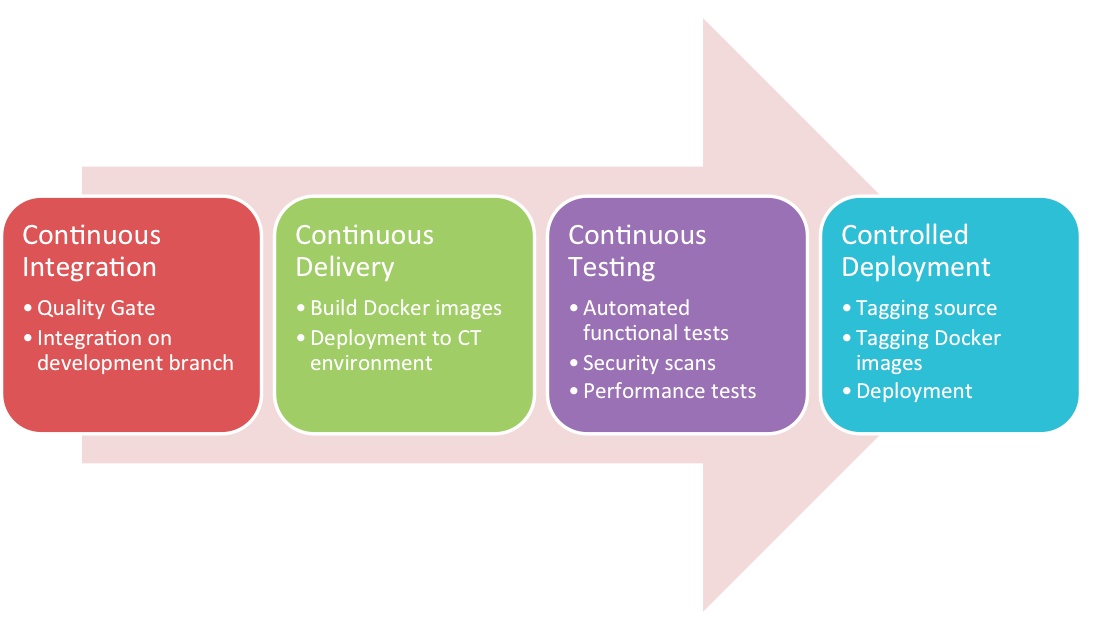
In our case we adopted the four step approach outlined below.
Continuous Delivery and Continuous Deployment are often confused of but are two different things. Martin Fowler describe the differences as follows,
“Continuous Delivery is sometimes confused with Continuous Deployment. Continuous Deployment means that every change goes through the pipeline and automatically gets put into production, resulting in many production deployments every day. Continuous Delivery just means that you are able to do frequent deployments but may choose not to do it, usually due to businesses preferring a slower rate of deployment. In order to do Continuous Deployment you must be doing Continuous Delivery.”
Fully automated continuous deployment is often considered a business risk especially in an enterprise setup. This is why a “release process” exists where the changes would be systematically and predictably delivered to the end users.
Continuous Integration
Our CI process would be triggered when a developer commits the code to their relevant feature branch. The Git hooks associated with Git repository would now trigger the build process in a Jenkins Cluster. Jenkins pipelines are used to drive the build process and there is a quality gate check that is associated with the build process. Quality gate check should be based on what is considered as minimal requirements to commit to the common development branch. In our context the quality gate check validates,
- Whether build is successful
- Unit tests have passed
- No code style violations
- Code coverage on new code is above 80%
- No vulnerabilities or code smells reported by Sonar scan.
Continuous Delivery
If the quality gate has passed, the developers can submit their pull requests. Integration Managers would merge the code to the common development branch. This would kick start the build process on the common development branch and if successful would go on to build the docker images.
Ideally all tests should execute as a part of the integration process but practically this would be inefficient due to the test execution time. Therefore we’ve designed this into an overnight segment called “Continuous Testing”.
Continuous Testing (CT)
This is an overnight process where tests such as functional tests, security scans and performance tests are executed on the latest successful build of the software. Prior to test execution the new containers would be deployed in the continuous testing environment based on the latest docker images. The persistent volumes attached to the Kubernetes cluster would be restored as prerequisite for testing. Note that all these activities are scheduled and completely automated.
The test report is examined in the following morning ahead of the daily standup meetings. Any scripting issues would be fixed by the quality assurance team and any code issues would be fixed by the development team. CT failures are considered priority and would be fixed in the earliest instance possible.
Controlled Deployment
The deployment is simplified as most of the hard work is already done in the three previous steps. A release can be done at any point with a successful CT cycle being the only qualification criteria. The release scripts would,
- Tag the docker images with the relevant version number
- Tag the source repositories with the version number
Now the release can be deployed in other environments in the release pipeline. Ultimately the promotion of the release to the production would be a business decision. A docker + Kubernetes setup would simplify the deployment process and the results would be predictable across all environments.
Available Technology
In our case we choose to use a combination of tools as it seems to provide the best solution for our complicated needs. Most teams developing enterprise products would benefit from such a ground up approach. Our tool stack consists of,
- Jenkins in master-slave mode as the build server
- Jenkins Pipelines to drive the CI process
- Git Hooks to trigger builds with code commits
- SonarQube as the code quality tool
- Robot Framework for automating functional tests
- JMeter for performance testing
- OWASP ZAP for security scanning
However there are other commercial and free tools available that you might want to evaluate depending on your requirement.
The version control providers also offer their own stack of CI/CD tools.
The cloud vendors also offer CI/CD tools to fast track integration in the cloud
- AWS CodePipeline
- Azure Pipelines
- GCP Tools
- Knative (for serverless)
Conclusion
An efficient CI/CD pipeline can significantly improve the time to market and help maintain stability and quality of the software being delivered. However a successful implementation requires not only the right technology but also the commitment from the key stakeholders. The project sponsors should take a long term view when investing and the technical leadership has a major role in driving the transformation.
Writing Effective User Stories
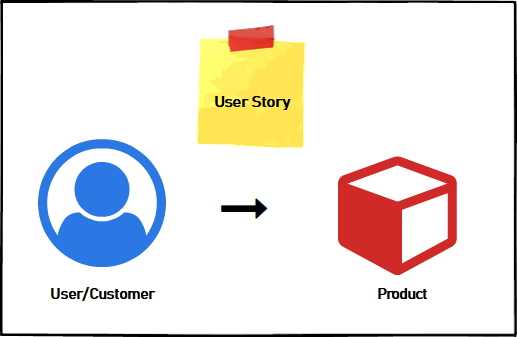
What is a User Story?
We can define a user story as the short and simple description of a functionality used in Agile practice. Basically, they are written to capture the requirement from the customer or the end user perspective. It will simply say What type of users, What they want and Why they want it. The user stories should be written in a language where it is very clear to both customer and the scrum team “as to what the customer wants and why they want it and what kind of customer wants it”.
Scrum teams should understand the customer needs and they should take care of how to cater the requirement from technical perspective.To take care of the technicality or back end functionalities they sometimes have technical user stories as well.
Basic Functionality
Now will look into the user story structure and understand what are the important things we should include in it.
User Story
This is the sample template that we are widely using when it comes to user stories.Use the template when it is helpful, but don’t feel obliged to always apply it. Experiment with different ways to write your stories to understand what works best for you and your team.
As a <<CUSTOMER TYPE>>
I want <<WHAT CUSTOMER WANTS>>
So that <<WHY CUSTOMER WANTS IT>>
Acceptance Criteria
Also as a PO or Proxy PO you need to make sure to write the acceptance criteria in order to accept the story. This is something very important and this will help your QA team a lot when they write test scenarios and test cases.
Definition of Done
Many organizations use this method in different ways. Some have DOD user story wise and some have DOD by release wise. It’s up to you to select the best method which suits your company but I prefer this using release wise rather story wise because ideally DOD cannot change story to story. But in a nutshell here you have to mention what are the important items to be completed before sending it for the UAT (User Acceptance Testing)or Customer demonstration.
Now will take an example scenario and see how we can develop a user story around it.
Assume that a customer with an online web-store wants their buyers to use credit card options to buy items. In this case I have treated the“Buyer” as the end user/customer but you can write this treating “Web-store owner” as the end user/customer.
User Story
As an online buyer
I want to use my credit card to purchase an item
So that I can immediately purchase my item from the web-store
If you want to write this treating “Web-store owner” as the endures then most probably the user story will look like this
As a web-store owner
I want my buyers to use their credit card option to purchase items
So that I can immediately do the transaction
Acceptance Criteria
· Accept Visa and Master cards
· Validate customer card details (Card Number, Name, CVV, and Expiration Date)
· Amount confirmation from the buyer
· Generate success or error messages
Definition of Done
· Unit test case completion 100%
· Test coverage completion 100%
· QA sign-off
· PO/BA sign-off
That’s a simple example of how to write a user story.Based on my experience of working with user stories for nearly 6 years I can say, Its very easy to write them but we should know the correct methods and tips to write an effective user stories.
Tips for writing effective and good user stories
A very well written user story will meet the criteria of Bill Wake’s INVEST acronym
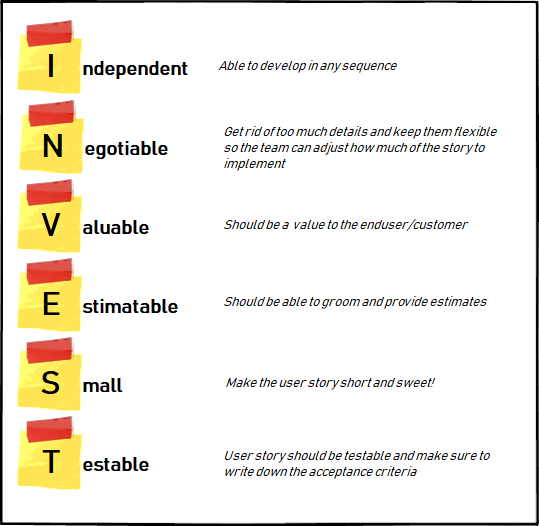
Bill Wake’s INVEST acronym
Also remember the below points which I am sure will come in handy when writing user stories
- Think from user perspective
Rule #1 and the very important one.
As the name implies user story has to explain in ‘end user’ perspective. If you don’t understand the user requirement as to what they want and why they want, then you have to do your homework first.
- Make your story Simple and Concise
This is one of the important things which you have to understand. User story should be short and concise and should not have any ambiguity in it.
- Acceptance Criteria
Always remember to write acceptance criteria so that team is aware of your expectations
- Discuss your stories with the teams
This is one of the methods which I personally prefer. You have to make the stories visible to the team and you should always make it as a practice to discuss it with the technical team. Before going into grooming sessions make sure that the team is aware the depth of the user stories. In this way you can save more time in your grooming sessions.
- Don’t hesitate to add NOTES
If you have more information which you want the team to know, always make a note in there so that the teams can understand the user story in more detailed way.
- Keep the UIs aligned with user stories
If you are doing a requirement related to a front-end functionality then it’s better to have the relevant UI attached to it. That way the teams can easily understand what should be the outcome.
These are the few steps you have to keep in mind when you want to write a effective user story.😎
What are the best agile practices to follow as Business Analysts or Product Owners?
When we think of writing about some best practices to follow, according to me the most effective way of bringing that into words would be based on our experiences. So I thought of writing this articles based on the experience I have gained working as Business Analyst/Product Owner.
In the early stage of course based on the narrow knowledge I had on Agile I was not very keen on practicing it until I got the real taste of it. Agile practices and business analysis actually go hand in hand and deliver remarkable values to company when they leverage efficiently and effectively.
I am not going to explain why we need business analysts in agile because that’s not what this article is about. Now let’s start looking at what we can do to make the entire process efficient and effective to all team members by using agile principles.
I hope you all are familiar with the term Agile and we can easily put it as “building a software incrementally, instead of trying to deliver it all at once near the end”. That’s simply what Agile means.
Scrum is one of the subsets of the agile methodology and the most widely used framework process in agile development. (A “process framework” is a particular set of practices that must be followed in order for a process to be consistent with the framework. (For example, the Scrum process framework requires the use of development cycles called Sprints)
Listed below are the good practices which you can do as a Business Analyst or as a Product Owner to improve the entire business process using Agile
1. Plan your Sprint at least one week in advance
Trust me this helps a lot. As a business analyst or a product owner you have to own the backlog or you have to take the ownership of maintaining the backlog. You can definitely work closely with the scrum master (Scrum master is the facilitator in the scrum or the agile development) to plan the sprint ahead. Don’t wait till the last moment to plan the sprint. Make sure you have enough user stories prepared (groomed) to the sprint so that you can get the full Velocity out of the development team. It’s not a good practice to take user stories in the middle of the sprint.
2. User Story Review Board (USRB)
Have a requirement walk-through session (User Story Review Session) with the development and QA teams prior to the backlog grooming session. (Backlog grooming session is the place where we can get estimates to the user stories). This is also a very important practice to follow and I personally do this with my teams all the time. Goal is to have a requirement walk-through with the team (Dev/QA) and get their inputs. In this way we can reduce the ambiguity and the concerns technical team is having which can be a great help when it comes to the backlog grooming sessions. Remember as BAs/POs you have to have an open mind as well as you should be ready to justify your requirements or your solutions to the team. If the team feels that you are not confident with your requirement or solution then they are not going to listen to you. Don’t forget to take notes and document all the inputs and suggestions so that you won’t forget that after the meeting.
3. Plan the backlog grooming session very well
Now for this you have to be prepared! 😎
Typically this is the place where the BAs get so many questions. That’s why I told you to have a requirement walk-through session (USRB) before the grooming and so that we can get fewer questions from the technical teams at the grooming session which will help you to save your time and have a productive grooming session. Before the session make sure you send the user stories to the teams or update in your agile tool (I use JIRA) so that technical teams are aware of what is going to get discussed.
You can get help from the scrum master to track the efforts at user story levels and make sure to update the story points then and there. One of the biggest mistakes that most of the BAs/POs are doing which you should avoid in my personal opinion is to ‘Challenge the effort’ of user stories. This can cause several issues and damaging the trust between you and the team is the biggest impact. Always trust your team and they will trust you back and I am telling this using my personal experience.
4. Have small scrum teams
It’s a main part of the agile scrum process that we do have a daily update meetings as in ‘Daily Stand-ups’ with the team. I highly recommend not having larger teams as your scrum teams. Talk with your scrum master and have a small team (maximum 6 members). Daily stand up meetings are supposed to be maximum of 7–8 min of your time. But what happens if you have a larger group like 15- 20. Then it will take more than 15 minutes to have the meeting and trust me you don’t want that. So make it simple. Have a small team and just give the update as “What I did yesterday and what I’m planning for today and any blockers for my work. That’s it Easy peasy lemon squeezy 😁
5. Don’t forget about “Sprint Review” session
After every sprint there has to be a sprint review session where the team members are demonstrating what they did during the last sprint. Trust me this is very important as BAs/POs because this is the place where developers showcase the user stories they implemented and if you have any concerns on how the requirement has implemented raise your hand and point it out. It could be a simple question you have or it could be something developer has improvised. Then and there ask the questions and sort it out and appreciate their work.
6. Finally the Retrospective
This is the place where the team members can voice their concerns or suggestion to be heard. Once in every 3 sprint (there is no hard and fast rule for that) you can have a session and discuss What went right, What went wrong and What are the improvements to be made for the scrum.
I hope you find this article as productive. So basically these are the best practices which I can point out when it comes to the practical world.
Authentication as a Service for Enterprise Applications

In this article let’s look at how we can design a robust authentication framework that could cater for heterogeneous identity management requirements in an enterprise landscape. Authentication is just one but an important aspect of a wider security implementation and it is always advisable to consider the “big picture” of security when it comes to framework design and technology selection.
Basics in brief
It is not the intension of this article to cover the fundamentals but what really is authentication? In simple terms it is the process of identifying your self to a service provider before receiving the service. Term authentication is often used in conjunction with the term authorisation which is concerned with agreeing which services the user has access to.
Authentication may be achieved in several different ways depending on the type of application and the context in which it is used.
- Logon Authentication — in this method user provides some form of credentials to authenticate them selves. This could be username/password, smart card, finger print, voice pattern, retinal scan etc.
- Single Sign On (SSO) — instead of logging into individual applications, user would log into a domain which in turn provides access to multiple applications belonging to the domain
- Remote Authentication — user connecting to a secured remote network may be authenticated by different methods such as Password Authentication Protocol (PAP), Challenge Handshake Authentication Protocol (CHAP), Extensible Authentication Protocol (EAP) etc.
There are number of protocols used for authentication such as Kerberos, SSL, Microsoft NTLM, PAP and SPAP, CHAP and MS-CHAP, EAP, RADIUS, Certificate services etc.
In designing modern applications an area of interest would be API authentication. In a service driven architecture, the client applications would obtain services through the service APIs and the services need some mechanism to build trust with the client. Some common approaches used are,
- Basic Authentication — the username and password is passed in every API call which is validated by the service before responding to the call. This method is very simple however it has many drawbacks especially when used in a public network and the use of SSL is a must to avoid “man in the middle” attacks. However basic authentication could still provide a simple enough authentication solution for services that would essentially be internal.
- API Keys — users have to login just one time where an API key would be provided that can be used in further communications with the API. This approach reduces the threat surface given that username and password are exchanged just once. Also it is more efficient compared to basic authentication as the key validation would be simpler compared to username/password validation. Still the API keys can be compromised in an insecure network so not the best choice for a public network.
- OAuth — OAuth is not exactly an authentication method but more of a “ delegation” mechanism with some capabilities of authorisation. Following a successful authentication, OAuth provides a token that is independently verifiable by the service. Also OAuth supports the establishment of scope which could be used to for authorisation.
Design for enterprise
Enabling authentication is not that difficult given the technologies and the tools available, but designing for the needs of the enterprise is lot more complicated. It requires taking a broad view towards the stake holders requirements and building a robust and a scalable framework. Following are some key aspects that needs to be looked into during the design phase.
- Architecture — the architecture behind the application is an important consideration. For example in a monolithic architecture the authentication function could be tightly coupled with the core application where as in a service oriented or micro services architecture the authentication function should be decoupled and reusable by all services.
- Integrations — the diversity of the components in the application landscape needs to be looked into. It is likely that 3rd party applications are integrated that requires different types of authentication. For example your in-house developed services may be authenticated by OAuth but you may need to integrate a 3rd party component that only supports basic authentication
- Identity storage — enterprise applications often coexist with other applications in a larger technology landscape. Therefore an application-local user store may not always be ideal and facility should be available to integrate external identity servers
- Features — when it comes to modern applications, there is a huge demand for security features such as multi-factor authentication, identity federation, social logins etc. Authentication service should enable these features efficiently and conveniently.
- Non functional requirements — in designing authentication, your general design principles should apply without any compromise. For example authentication function should have low latency, should be scalable and reliable. Also if your application is multi-tenanted so should authentication be. Strong auditing capability is another important requirement to consider.
Authentication as a Service (AaaS)
Authentication as a Service or AaaS is aimed at centralising the authentication logic and making it available as a service to other applications in the system landscape. AaaS should support standards such as OpenID Connect, SAML etc. and should provide the identity services typically through an API. This approach simplifies application development as the only requirement is to consume the authentication service.
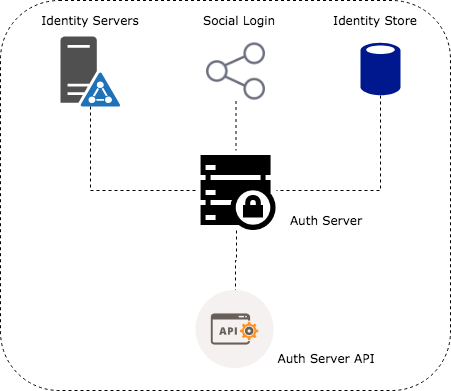
In the heart of an AaaS model would be an authentication server providing an internal identity store as well as integration to 3rd party identity providers such as LDAP servers, social platforms etc.
In a typical authentication flow the application requiring authentication would redirect the user to a login page hosted by the auth server. Auth server would then validate the user credentials and issue an auth token which would then be passed on to the client application. However there can be alternative approaches where the client application uses the auth server API to validate credentials and obtain the auth token.
There are couple of important points to note with the AaaS model
- Scalability and Reliability — with this model we are now centralising the authentication function. Therefore we have to ensure the high availability and scalability of the Authentication server to avoid single point of failure.
- Adaptation — if you are bringing in the AaaS model into a somewhat legacy architecture you would need to carefully consider how you would position the authentication service in the application landscape. For example if the legacy applications already maintain user accounts, it will need to be migrated across to maintain a single point of truth. But the individual applications may still need detailed user information so some data may still reside in the application level. This is where you would need to draw a boundary between what you consider as “user account” and “user profile” and manage account data in auth server and profile data in the application level. However there is a capability of passing user data especially when OpenID Connect is used but again there are limitations to the volume of information that could be passed on in an ID token.
Authentication Server Technologies
There are couple of approaches that could be taken to enable AaaS for your application. Firstly you can consider developing the Auth server and the ecosystem from the scratch. For example, to enable OAuth capability you can use following libraries depending on the type of stack you are running. Whilst this approach may offer you flexibility you are likely to be reinventing the wheel to some extent given the range of off-the-shelf auth server implementations available. If you make the right choice you can benefit from the best practices the product would naturally bring. So my advice is to adopt an existing product unless your requirements are very different to the rest of the world.
During our research we looked number of solutions including Keycloak, CloudFoundry UAA, Keystone, Forgerock, Midpoint and Apache syncope. Some interesting comparison is available at https://compare.evolveum.com/features-table.html
Keycloak by far was our first choice as it seems to satisfy most number of requirements. It’s an open source product maintained under the stewardship of Red Hat. From an integration perspective, one of the biggest advantages of using Keycloak has been the availability of adaptors which does most of the heavy lifting when it comes to token validation, token refresh etc.
Keycloak integration allowed us to facilitate an identity store internal to the product and also offered the flexibility to federate identity from external stores such as LDAP servers. Keycloak comes with a built-in LDAP/AD plugin and could be extended to use other identity servers through the service provider interface (SPI).
Keycloak Authentication
If you are interested in getting your hands dirty with keycloak authentication, please continue. Let’s look at how we can configure keycloak authentication server with minimal settings and enable security in the applications. The application considered is a web application where the content is served through a Express.js web server and the java based backend is accessed through a REST API protected by spring security.
Note that keycloak documentation is comprehensive and the steps below would only be explaining the mandatory steps.
Installation and configuration
- Keycloak standalone auth server distribution can be downloaded from here
- Downloaded file may be extracted in following manner
Linux/Unix$ unzip keycloak-4.1.0.Final.zipor$ tar -xvzf keycloak-4.1.0.Final.tar.gz
Windows> unzip keycloak-4.1.0.Final.zip
- The keycloak server can be started in the following manner
Linux/Unix$ …/bin/standalone.sh
Windows> …\bin\standalone.bat
- By default the server starts on port 8080. So for example if you installed locally, then you may access the auth server admin console through following url http://localhost:8080/auth
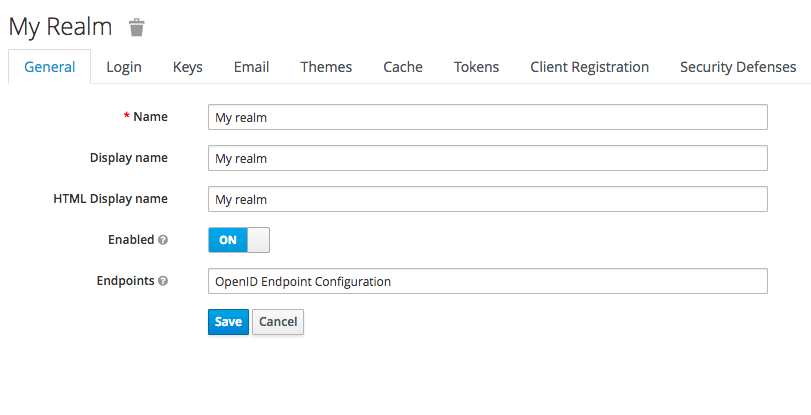
- During the first login you will be required to create an admin account to access the admin console.
- Once logged in you will be required to create a “Realm”. This would be almost like a container for all authentication settings for a given context. If your application is multi-tenanted then you might consider creating a realm per tenant considering the degree of autonomy you would like to provide to your end users.
- Next step is to register the client applications with keycloak. This would be done in the “Clients” section of the admin console. We would separately register our node application and the backend service.

Note the following important settings
- Client Protocol — you can choose between OpenID Connect or SAML
- Access Type — you can choose between public, confidential and bearer only. Only public and confidential types would initiate a login action whereas bearer only type would only validate bearer tokens and would not initiate a login action.
- Valid Redirect URI — a valid url pattern that keycloak would redirect to after a successful login
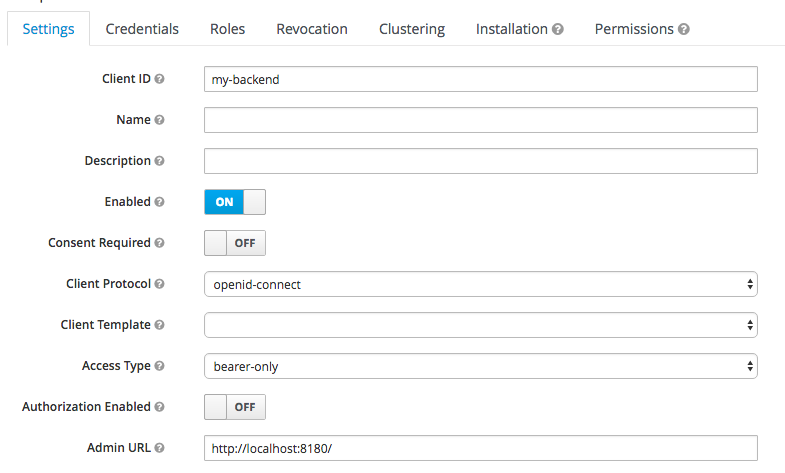
- Now the auth server is almost ready to go. You may want to setup some user accounts to test the configuration. Make sure you setup credentials and assign some user roles.
Protecting the front-end
In-order to simplify integration with the auth server, there are adapters made available for various platforms. Full list of adaptors are available here
The front-end would be protected by the keycloak Node.js adapter.
- A keycloak.json file in the below format need to be placed in the root directory of the project
- Note that the keycloak.json file should now refer to the frontend application. The “realm” and “auth-server-url” are read from the environment variables.
{
"realm": "${env.KEYCLOAK_DEFAULT_REALM_REF}",
"auth-server-url": "${env.KEYCLOAK_SERVER_URL}",
"ssl-required": "external",
"resource": "my-frontend",
"public-client": true,
"confidential-port": 0
}- Following code would enable keycloak security
var Keycloak = require('keycloak-connect');
var memoryStore = new session.MemoryStore();
app.use(session({
secret: 'mySecret',
resave: false,
saveUninitialized: true,
store: memoryStore
}));
var keycloak = new Keycloak({
store: memoryStore
});
app.use(keycloak.middleware({
logout: '/signout',
admin: '/adm'
}));- Each route need to be protected with keycloak middleware
app.get(‘/profile’, keycloak.protect(), myRenderFunctionHere());
Protecting the backend
It is assumed that application backend is protected by spring security. Keycloak spring security adapter enables keycloak authentication for the java backend.
- Add the following maven dependancy for your project
<dependency>
<groupId>org.keycloak</groupId>
<artifactId>keycloak-spring-security-adapter</artifactId>
<version>${keycloak.version}</version>
</dependency>- Adaptor uses the keycloak.json file to locate and establish communication with keycloak server. This needs to be placed in the “resources” folder. The content should be following.
{
"realm": "${env.KEYCLOAK_DEFAULT_REALM_REF}",
"bearer-only": true,
"auth-server-url": "${env.KEYCLOAK_SERVER_URL}",
"ssl-required": "external",
"resource": "my-backend",
"confidential-port": 0
}- In addition following entries should be available in the application.properties file
keycloak.auth-server-url=${KEYCLOAK_SERVER_URL}
keycloak.realm=${KEYCLOAK_DEFAULT_REALM_REF}
keycloak.resource=my-backend
keycloak.realmKey = ${KEYCLOAK_REALM_KEY}
keycloak.bearer-only = true
keycloak.credentials.secret = ${KEYCLOAK_CLIENT_SECRET}
keycloak.ssl-required = external
keycloak.cors = true- By default keycloak provides an Authentication Manager implementation which is org.keycloak.adapters.springsecurity.authentication.KeycloakAuthenticationProvider. However we need to extend this so that we can inject the user profile (loaded from the target application) into the security context. A typical provider implementation is shown below.
public class CustomKeycloakAuthenticationProvider extends KeycloakAuthenticationProvider {@Autowired
UserService userService;@Override
public Authentication authenticate(Authentication authentication) throws AuthenticationException {
KeycloakAuthenticationToken token = (KeycloakAuthenticationToken)authentication;
CustomKeycloakAuthenticationToken customToken = new CustomKeycloakAuthenticationToken(token.getAccount(), token.isInteractive(),null);
KeycloakPrincipal keycloakPrincipal = (KeycloakPrincipal) token.getPrincipal();
KeycloakSecurityContext securityContext = keycloakPrincipal.getKeycloakSecurityContext();
AccessToken accessToken = securityContext.getToken();
User user = userService.findByUserName(accessToken.getPreferredUsername());
customToken.setSubject(user);
return customToken;
}- Note that the Authentication Token implementation is overriden here to hold the user object.
public class CustomKeycloakAuthenticationToken extends KeycloakAuthenticationToken {private User subject;public CustomKeycloakAuthenticationToken(KeycloakAccount account, boolean interactive, Collection<? extends GrantedAuthority> authorities) {
super(account,interactive,authorities);}public User getSubject() {
return subject;
}public void setSubject(User subject) {
this.subject = subject;
}
}- Finally you may adjust your security context to use the custom authentication provider
<sec:authentication-manager alias="authenticationManager">
<sec:authentication-provider ref="customkeycloakAuthenticationProvider" />
</sec:authentication-manager><bean id="customkeycloakAuthenticationProvider" class="[FQN of the auth provider class]" /><bean id="keycloakAuthenticationProcessingFilter" class="org.keycloak.adapters.springsecurity.filter.KeycloakAuthenticationProcessingFilter">
<constructor-arg name="authenticationManager" ref="authenticationManager" />
</bean>
Thats it really. You have now setup an auth server and connected you application to be authenticated by keycloak.
Conclusion
As stated before the key to a successful authentication framework depends a lot on the design. You should invest your time wisely to understand the big picture, define scope and select the right technology. There is rarely a “one size fits all” solution